Udacity Self-Driving Car Nanodegree Final Project, Part 1 - Setting the Stage
I’ve been holding out on you. I admit it, and I’m sorry. It wasn’t so intentional, though. I’ve been struggling with how to approach writing about the Udacity Self-Driving Car Engineer Nanodegree program’s final project. One reason for that is, well, it’s the final project and I don’t want to let go! I certainly don’t plan to close up shop and shut down the blog after it’s done, but I do plan to drag it out over several posts while I try to nail down what to dive into next. The other reason is (I hate to say this) that the final project turned out to be a bit anticlimactic. I’ll get more into why that is later, and it was a tremendous learning experience nonetheless, but I knew it wasn’t just my perception. I felt it from my teammates and from other students - the capstone just wasn’t ready for prime time. That said, the crew at Udacity was working to improve it all the while and I’m confident that they’ll have it ironed out for future cohorts lickety-split!
Going into the Nanodegree capstone project, I wasn’t sure what to expect. I knew we’d be working in teams, and that our code would eventually get to run on the actual Udacity self-driving car, Carla. Would we be writing the entirety of the code from the ground up, incorporating everything we’d learned over the entirety of the program, and then some? Surely not - that would be far too much for even a group of four or five to do in a few weeks’ time. What would we be responsible for, then? My questions were soon answered:
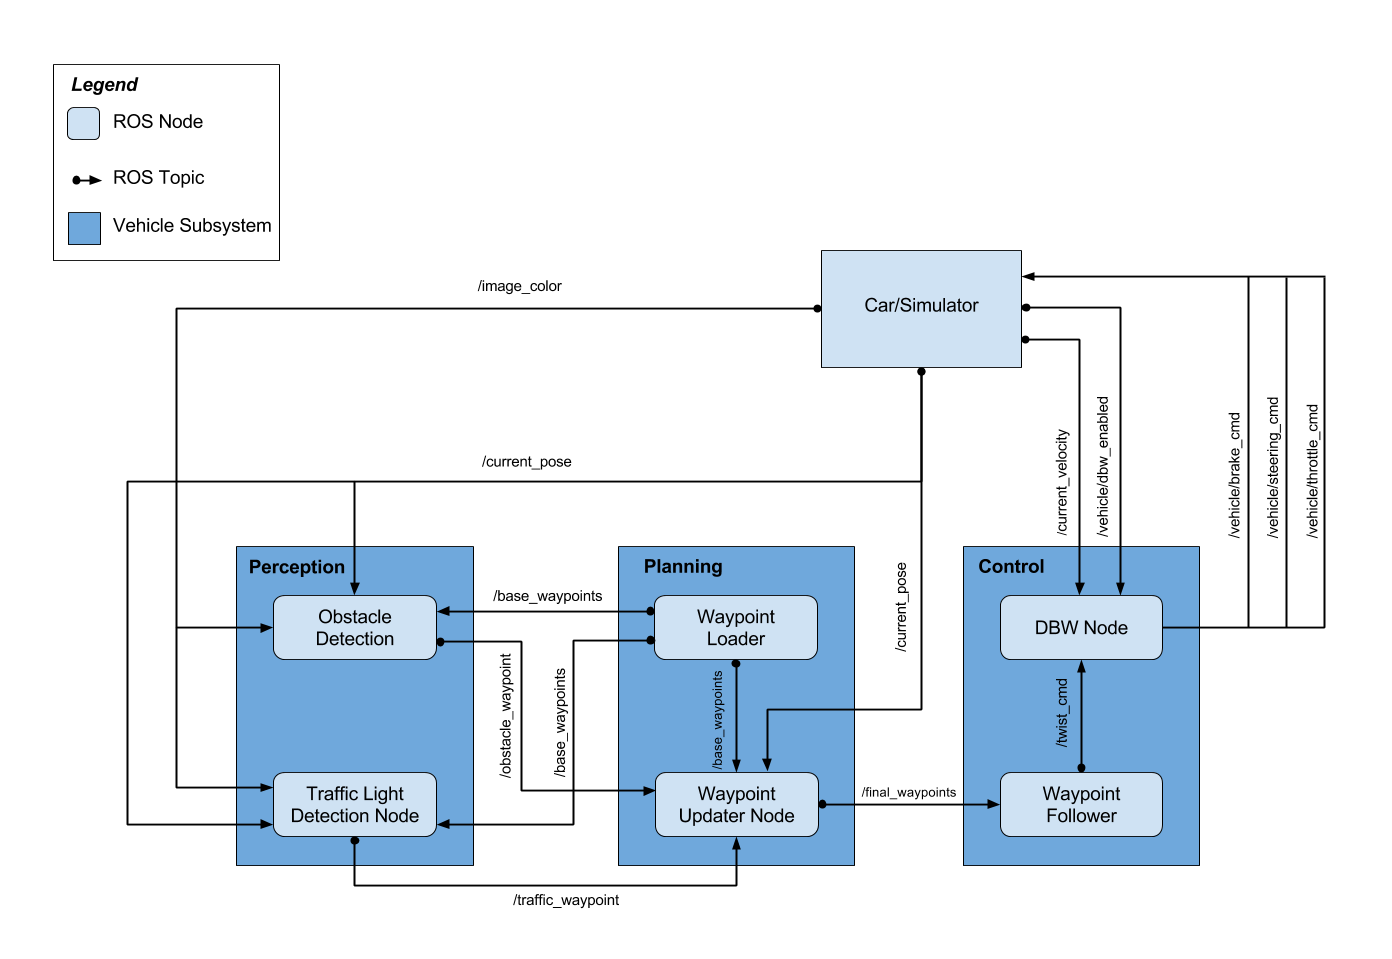
That image shows the vehicle subsystems (in dark blue, namely Perception, Planning, and Control) we’d be responsible for. The lighter blue boxes within the dark blue boxes represent Robot Operating System (ROS) nodes that execute a particular function of the containing subsystem. Not all of them were of concern to us for the project, though. The only ones we’d be writing code for were the Traffic Light Detection Node, the Waypoint Updater Node, and the DBW (Drive By Wire) Node. The lines show which nodes publish and subscribe to each other’s ROS messages and the names of the topics (e.g. /current_pose) to which those messages belong.
“Well, wait a minute, Jeremy! You mentioned ROS back in the day when you were doing the DiDi Challenge, but it was never covered as part of the Nanodegree, was it?”
Good eye, dear reader. You’ve been paying very close attention! Yes, we Nanodegree students had not been introduced to ROS yet, so that’s what the lessons leading up to the final project were devoted to. The material came from the Udacity Robotics Nanodegree, and included mostly topics that I was already familiar with having read A Gentle Introduction to ROS to prepare myself for the DiDi Challenge. Still, it’s never a bad idea to reinforce one’s learning, particularly on something so universally instrumental for a self-driving car engineer.
There were two configurations for our ROS package - Styx (the configuration to be run while developing and testing with the Udacity simulator) and Site (the Carla configuration, i.e. the real deal). The car was designed to follow a path made up of a set of waypoints, so each configuration had its own set of waypoints and other particulars (like camera parameters and such). The Udacity-suggested order of operations was:
- Edit the Waypoint Updater Node to take the complete set of waypoints and publish a subset corresponding to the next several waypoints the car will visit, with an associated target velocity for each waypoint, to the topic
/final_waypoints. - Edit the DBW Node to take target linear and angular velocity messages on the
/twist_cmdtopic and current velocity published on the/current_velocitytopic to produce control commands on the/vehicle/throttle_cmd,/vehicle/brake_cmd, and/vehicle/steering_cmdtopics. (At this point the vehicle should be able to move in the simulator, although it’ll blow through all the red lights.) - Edit the Traffic Light Detector Node to consume images from the
/image_colortopic (and other information) to determine if there is a red light coming up and publish the waypoint at which any nearby red light is located on the/traffic_waypointtopic. - Update the Waypoint Updater Node to publish
/final_waypointstaking into account waypoints for which the velocity should be zero when stopping at a red light.
Easy enough, right? We shall see. First, though, it’s time to TEAM UP! Stay tuned for the next episode, coming soon(ish)!
The code for this project can be found on my GitHub.